If you are looking to create a beautiful quilt to show off your crafting skills, then you will need to make a quilt frame. This guide will provide you with a step-by-step guide on how to make a quilt frame so you can begin making your masterpiece. With the right materials and a bit of time and patience, you will be able to create the perfect quilt frame for your project.
Overview of Quilt Frames
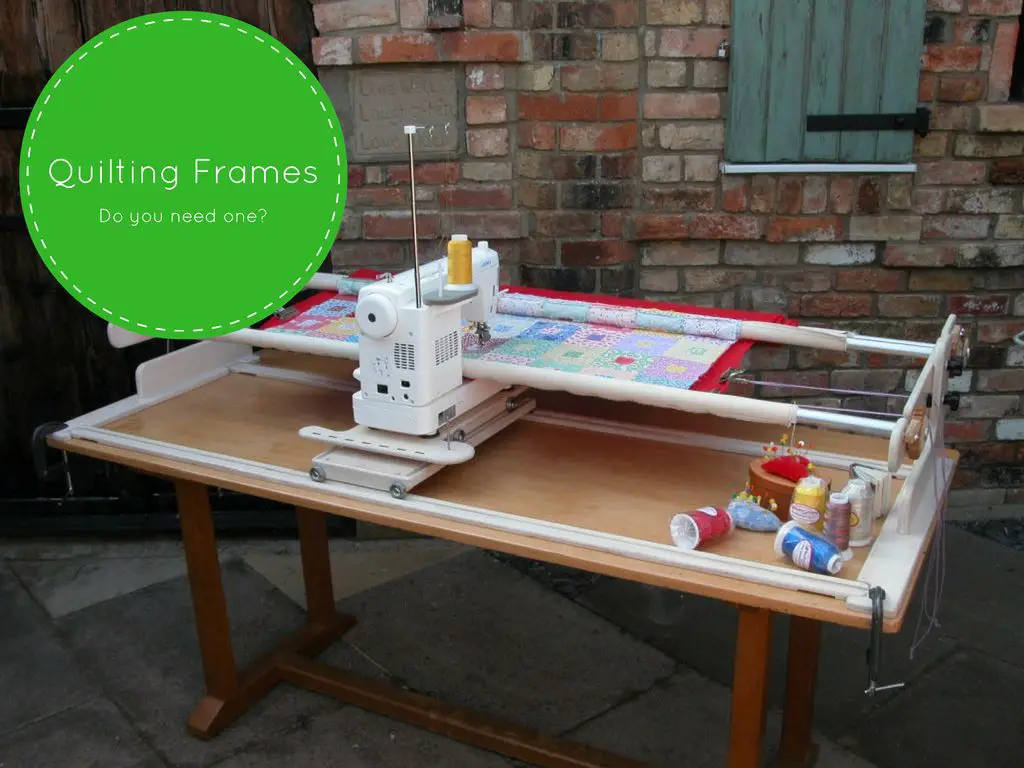
A quilt frame can be used to stretch and secure quilt layers in place while hand quilting. It also serves as a support system for quilters to guide their hands while they stitch. Quilt frames are available in many different types and sizes, and can be used both at home and in quilting studios.
Types of Quilt Frames
There are several different types of quilt frames available. A traditional frame is typically made of metal or wood and features two stationary sides that are connected by a pair of rolling bars. This type of frame is ideal for big quilts and can be used with a quilting hoop. Another popular style is a ‘lap hoop’, which consists of a single hoop that is designed to fit over the quilter’s lap. Finally, a tabletop frame is also available, which is suitable for small quilts and wall hangings.
Benefits of Quilt Frames
Quilt frames are a great way to make the hand quilting process easier and more enjoyable. This is because they provide a stable and secure base for quilters to sew on, making it easier to maneuver their hands and create even stitches. Additionally, quilt frames can also help to reduce fatigue while quilting, as they provide support and help to evenly distribute the weight of the quilt. Quilt frames are an ideal tool for those who are looking to make beautiful, professional-looking quilts.
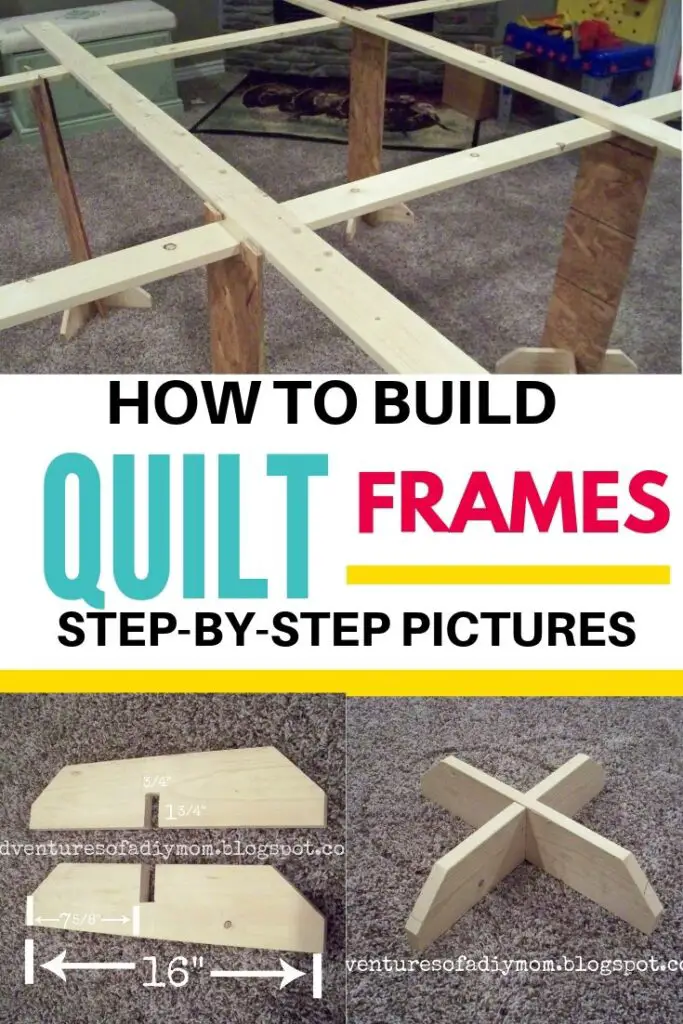
How to Make a Quilt Frame
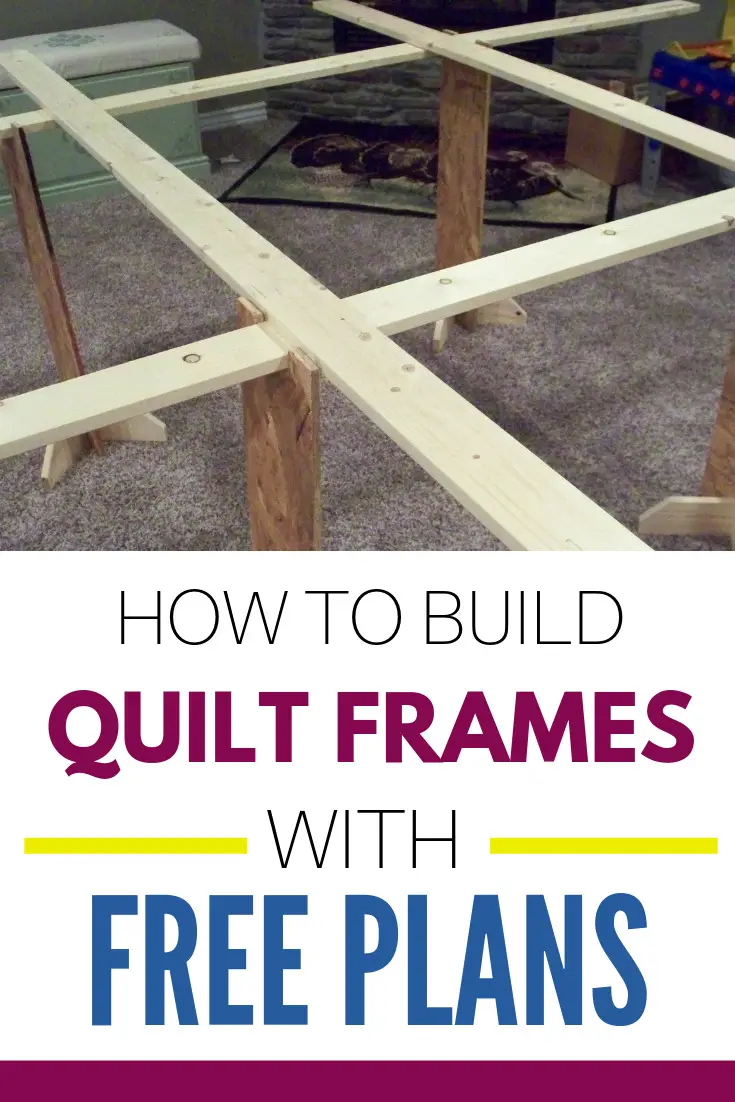
Materials Needed
- 1-inch lumber
- Circular saw
- Drill and bits
- Wood screws
- Paint or stain
Building a Wooden Quilt Frame
Cut the 1-inch lumber into four pieces of equal length, each one slightly longer than the desired finished size of the quilt frame. Connect the four pieces together at the corners using wood screws. Attach the corner braces to the frame. Apply your desired paint or stain to the frame.
Building an Old-Fashioned Quilt Frame
Cut four pieces of 2-by-2 lumber into equal lengths. Connect them together at the corners with wood screws. Cut four pieces of 2-by-4 lumber into equal lengths. Attach these pieces to the 2-by-2 frame to create a larger frame for the quilt. Paint or stain the frame.
Creating a Small Quilt Frame
Cut four pieces of 1-by-2 lumber into equal lengths. Connect them together at the corners with wood screws. Attach the corner braces to the frame. Apply your desired paint or stain to the frame. This is a great way to build a quilt frame for free.
How to Use a Quilt Stretcher
- Secure the Fabric: Attach the quilt fabric to the stretcher bars using push pins or tacks. The fabric should be taut and smooth, with no wrinkles or bumps.
- Tie the Quilt: Tie the quilt to the stretcher bars with yarn or thread. Use the same technique as hand-quilting: Make a knot at the beginning, insert the needle into the fabric at the corner of the stretcher bar, make a stitch, loop the thread around the stretcher bar, and repeat until the entire quilt is tied.
- Adjust the Tension: Adjust the tension of the quilt by tightening or loosening the yarn or thread. Use a quilting hoop to further tighten the fabric if necessary.
- Mount the Frame: Mount the quilt frame onto a wall or stand using screws or nails. Make sure the frame is securely mounted and won’t wobble.
Once the quilt is mounted on the frame, it is ready to be quilted. Using a quilt stretcher is an easy and efficient way to make a quilt frame at home. It ensures that the fabric is held taut for quilting and allows for easy adjustment of the tension.
Frequently Asked Questions
What tools are needed to make a quilt frame?
- Handsaw – to cut wood
- Tape measure – for measuring wood
- Power drill – for making pilot holes
- Screwdriver – for securing the frame
- Wood screws – for attaching frame components
- Wood Glue – for added strength
- Sandpaper – for smoothing wood surfaces
- Paint or Stain – for protecting the frame
What type of wood should I use for the frame?
Pine wood is the most popular choice for making quilt frames due to its affordability and strength. It is also lightweight and easy to work with. Oak is another great option for a quilt frame. It is strong and durable, and it has a beautiful natural grain pattern. Cherry and maple are also good choices, although they are more expensive and may require more maintenance.
How Much Fabric Will I Need for the Frame?
When making a quilt frame, you will need to determine how much fabric you will need. The size of the frame will determine how much fabric you will need. Generally, you will need to account for the length and width of the frame plus a few extra inches for the quilt’s border. Make sure to measure the frame twice to ensure that you have the right measurements. Once you have the measurements, you can calculate the amount of fabric you will need for the frame.
How do I measure and cut the wood to the correct size?
- Measure the dimensions of the quilt frame. Use a measuring tape or ruler to determine the length and width of the frame. Make sure to include the thickness of the wood when measuring.
- Mark the measurements on the wood. Use a pencil to draw the measurements on the wood. Make sure to mark the measurements clearly so you know where to cut.
- Cut the wood to the correct size. Use a circular saw or jigsaw to make the cuts. Make sure to wear safety glasses and proper protective clothing when operating power tools.
- Sand the edges of the cut wood. Use sandpaper to smooth out the edges and make sure they are even.
Can I Make the Quilt Frame With a Different Shape Than a Square or Rectangle?
Yes, you can make a quilt frame with a different shape than a square or rectangle. Here are some of the things to consider when doing so:
- Consider the size and shape of your quilt top. You want to make sure the frame you are building will fit the quilt top.
- Pick a sturdy material for your frame. You’ll need something that will be able to hold the weight of the quilt and stand up to use.
- Make sure you have the right tools and supplies for the job. Depending on the shape you are creating, you may need specialty saws or other tools.
- Measure twice, cut once! Make sure that all of your pieces are the right size and shape before you begin assembly.
- Take your time. Building an unusual shape quilt frame can take longer than a traditional square or rectangle frame.
Creating a quilt frame with an unusual shape can be a fun and rewarding challenge. With the right supplies and patience, you can make a beautiful quilt frame that will be the centerpiece of your quilting project.
Conclusion
Creating a quilt frame is a relatively easy project that can be completed in a few hours. With the right materials and tools, anyone can create a sturdy frame that is perfect for quilting projects. Following the step-by-step instructions provided in this guide will ensure the process goes smoothly, resulting in a frame that can last for many years.


