Making a half square triangle quilt is one of the most rewarding quilting experiences. It is easier to stitch than it looks, and the results are beautiful. This step-by-step guide will provide you with the tools and techniques needed to create perfectly stitched triangles and a stunning quilt. So, if you’re ready to learn how to make a half square triangle quilt, read on for all the tips and tricks you’ll need for quilting success.
What is a Half Square Triangle Quilt?

A Half Square Triangle Quilt is a quilt made with several small triangles that are sewn together to create a larger, more complex quilt design. Half Square Triangles (HSTs) are created by sewing two triangles together to form a right-angled triangle. The triangles can be made using a variety of fabrics, which can be combined to create unique designs. HSTs are often used to create blocks that have a more intricate look than a standard quilt block.
By combining multiple HSTs, quilters can create a variety of quilt blocks, such as stars, diamonds, pinwheels, and more. Half Square Triangles are a versatile quilt block that can be used to create intricate quilts with a wide range of patterns and designs. With the right fabrics and techniques, quilters can make beautiful quilts with Half Square Triangles.
| Quilt Blocks | Made with Half Square Triangles |
|---|---|
| Star | Pinwheel |
| Diamond | Log Cabin |
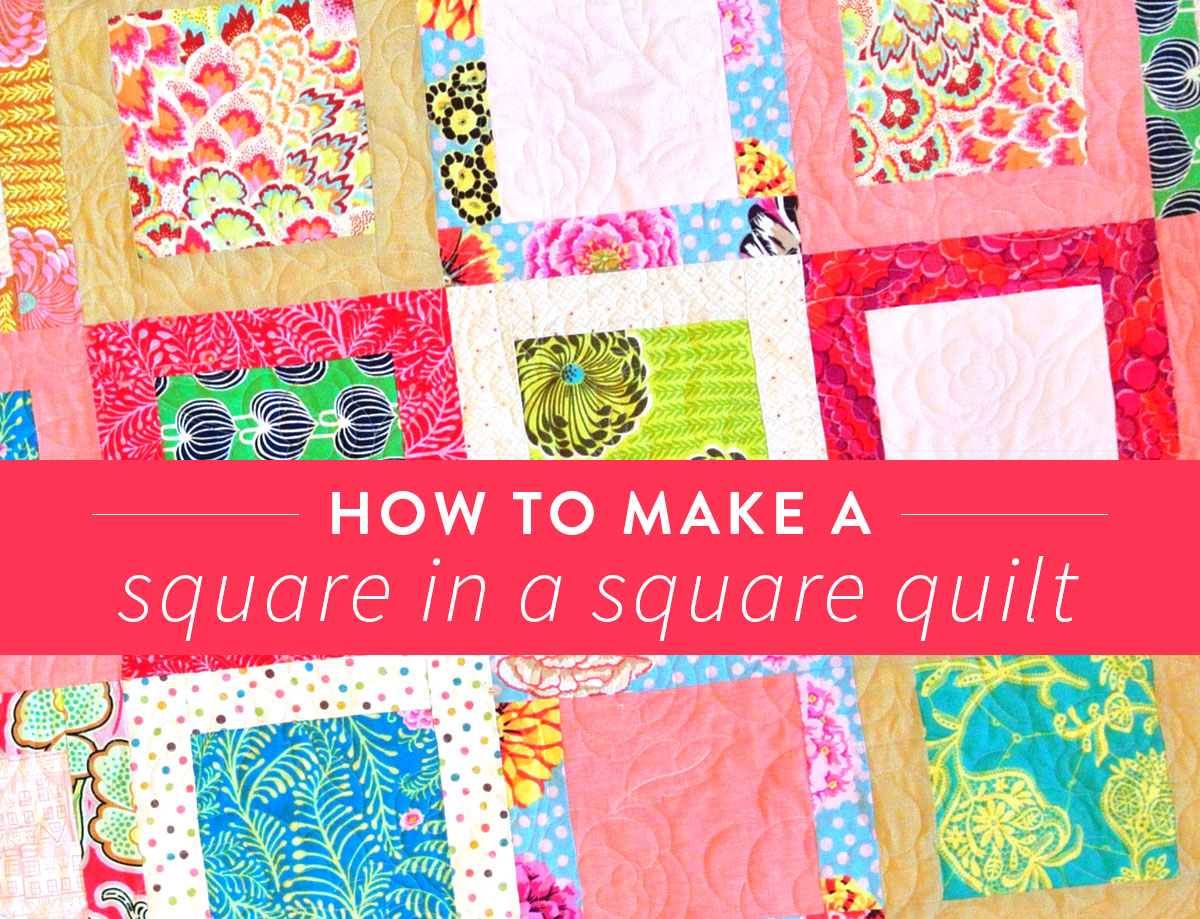
| Square in a Square | Double Irish Chain |
Half Square Triangles are versatile quilt blocks that can be used to make a variety of quilt blocks. From stars and diamonds to pinwheels and log cabins, there are many quilt blocks that can be created with Half Square Triangles. With the right fabrics and techniques, quilters can create beautiful quilts that feature intricate designs and patterns.
What Quilt Blocks Can You Make with Half Square Triangles?
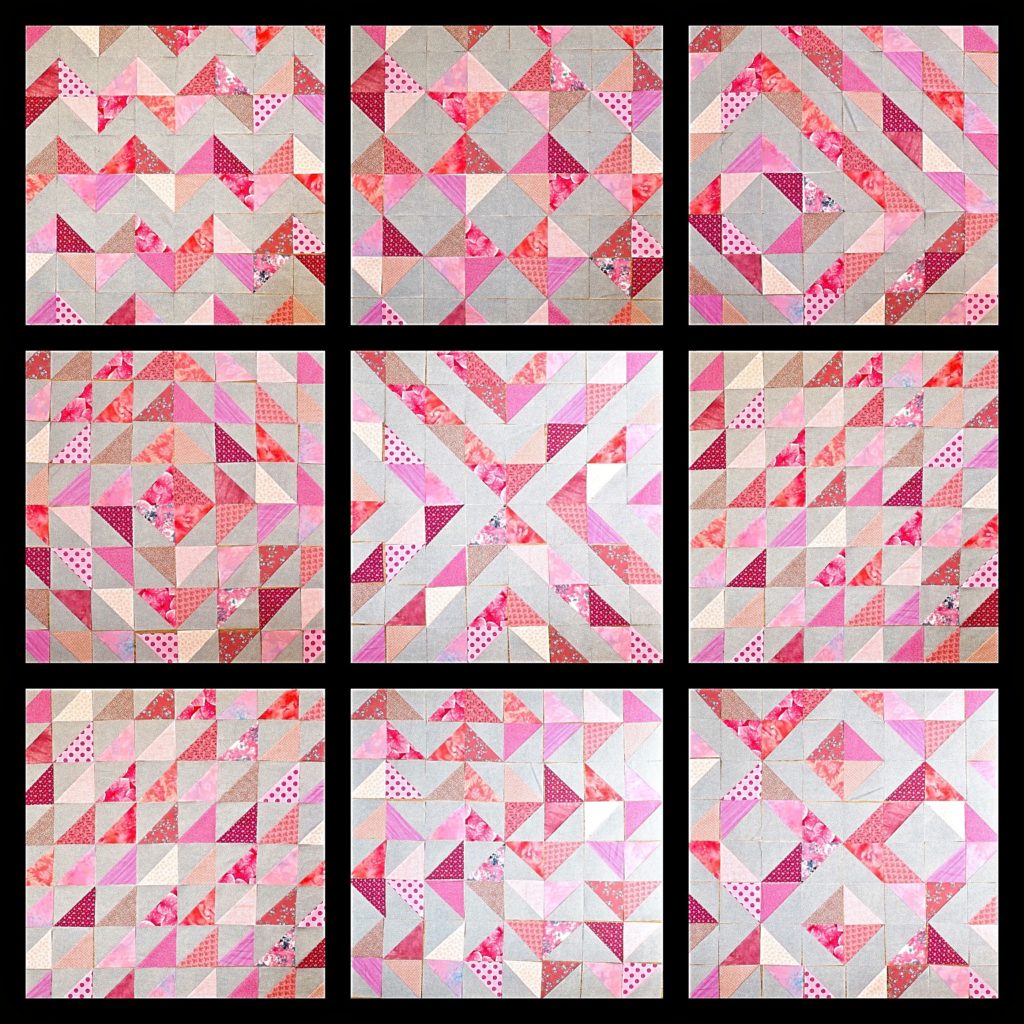
Half Square Triangles (HSTs) are an essential component of quilt-making, and are a great way to create a variety of quilt blocks. HSTs can be used to make star quilt blocks, checkerboard patterns, and even intricate floral designs. Depending on the number of HSTs and how they are arranged, the possibilities are nearly endless.
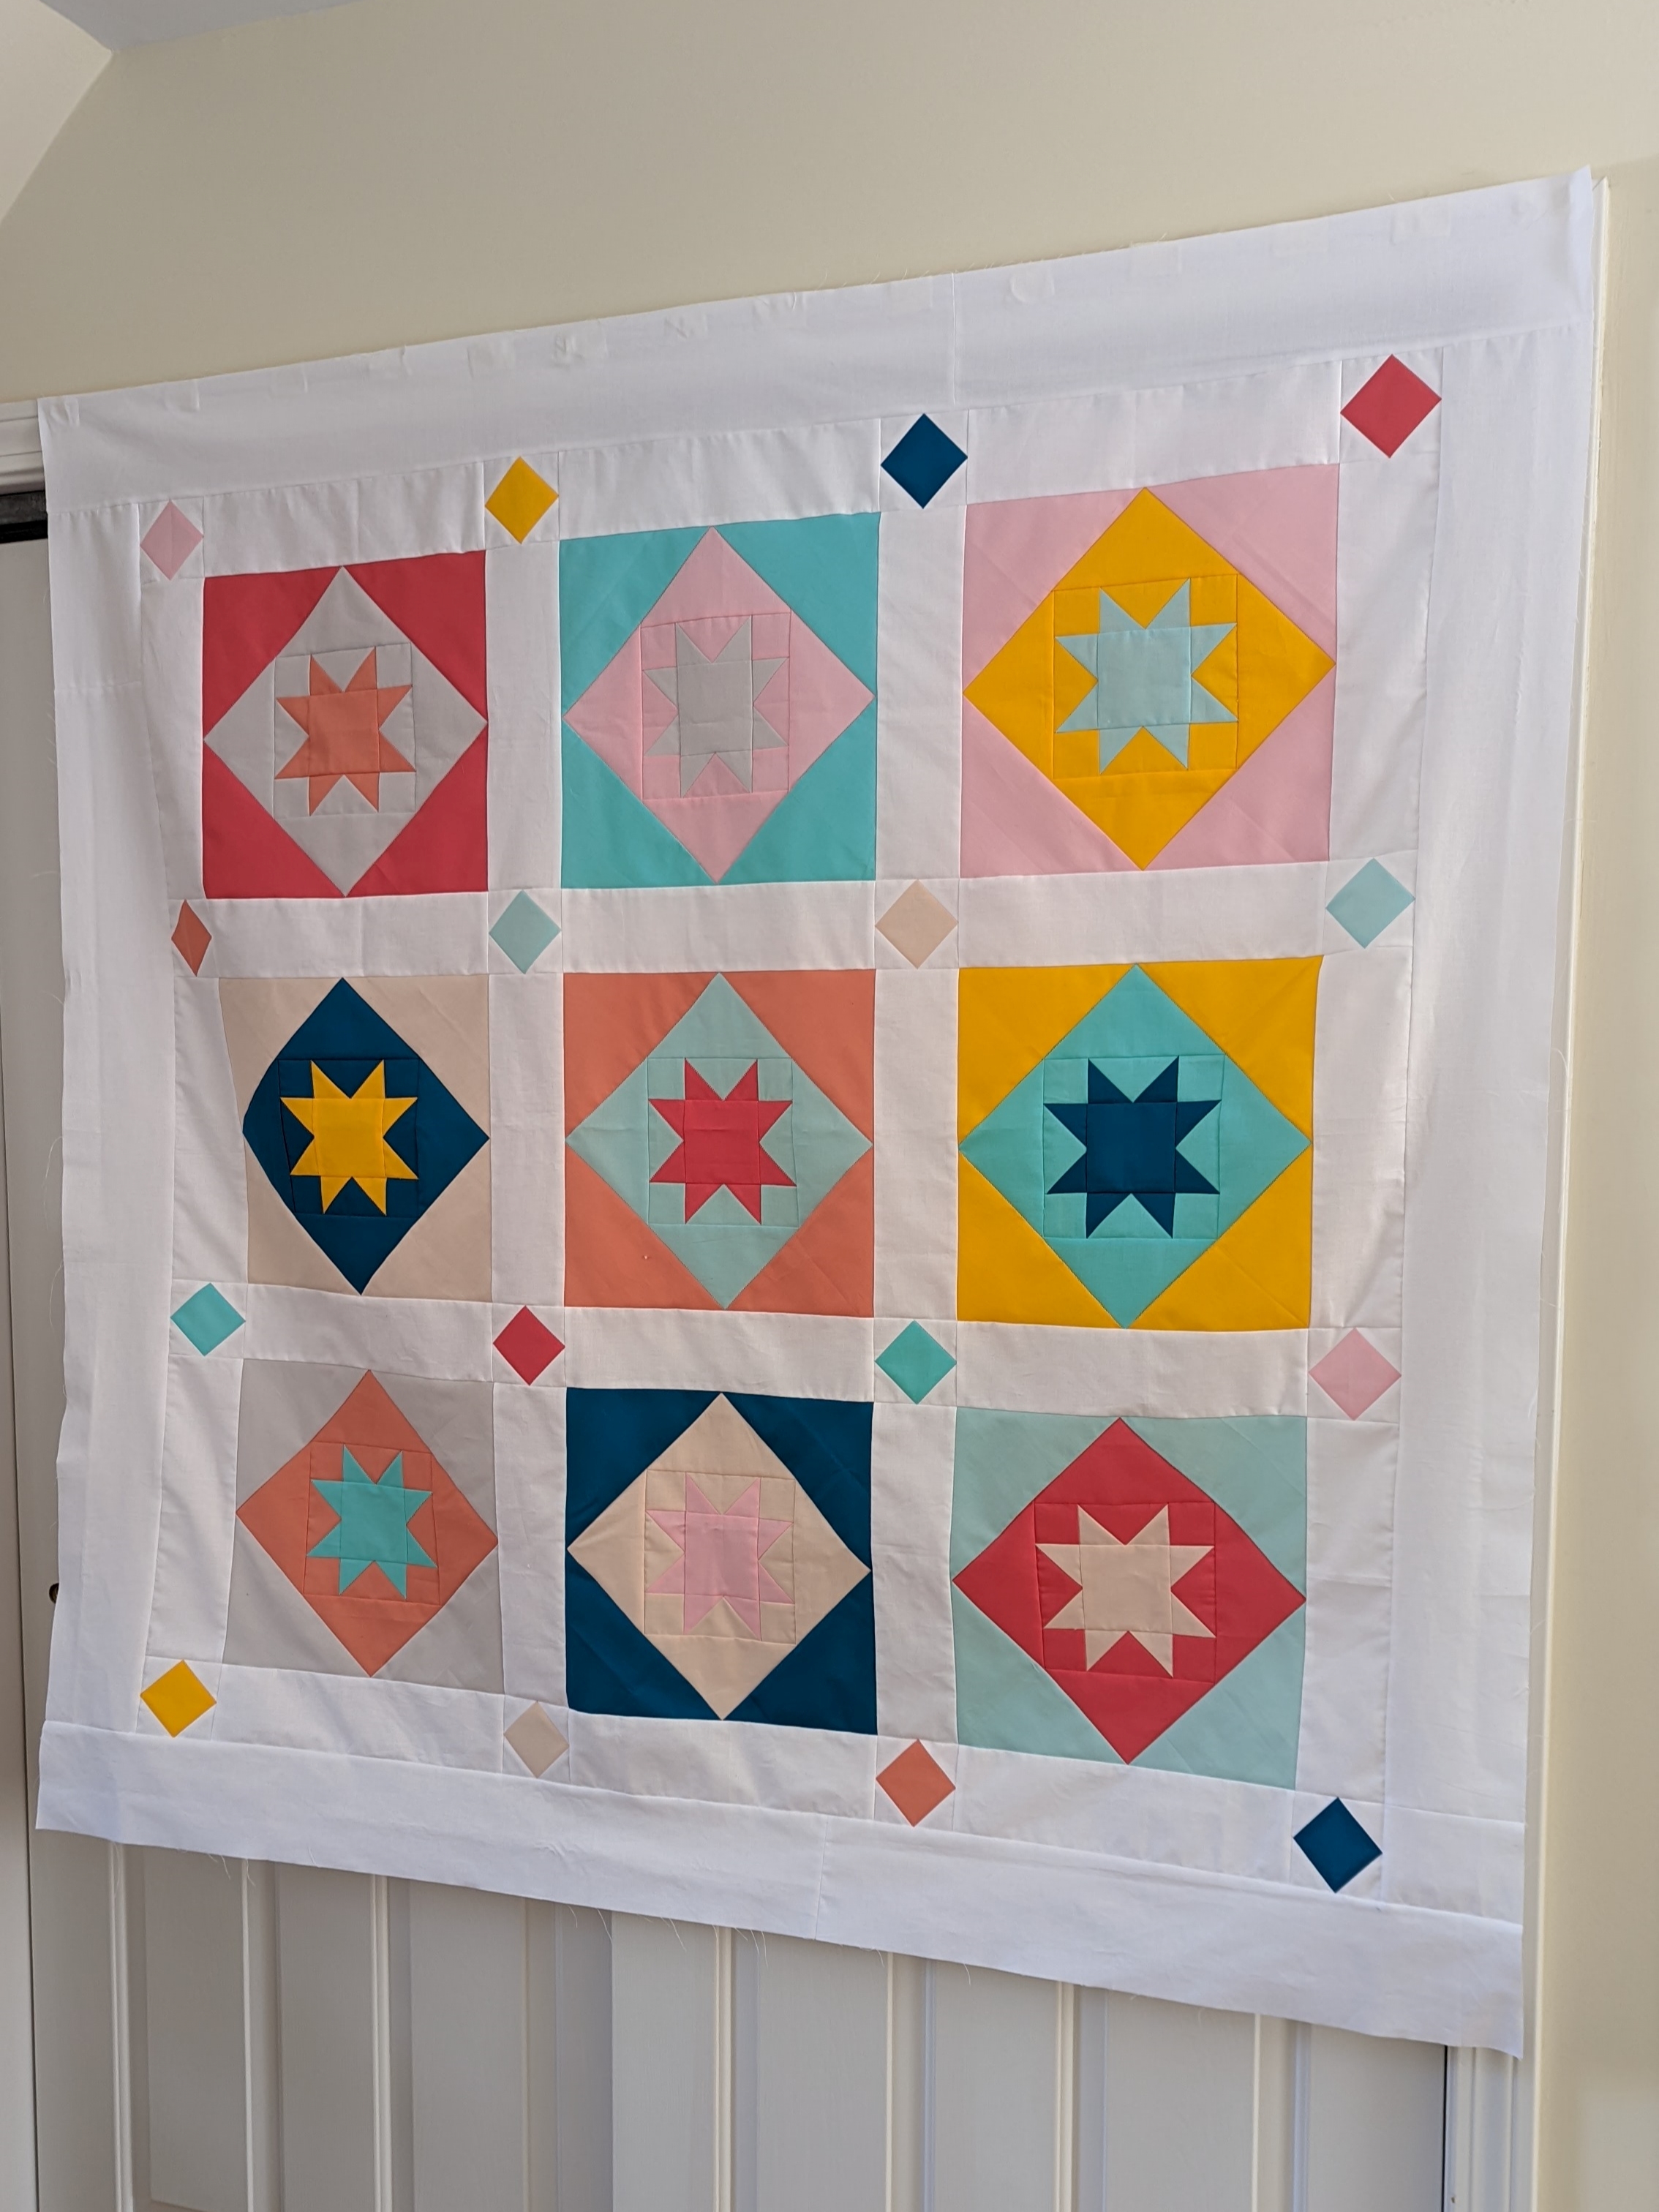
Star Quilt Blocks
HSTs can be used to make star quilt blocks that range from simple to intricate. The most basic star quilt block consists of four HSTs that are arranged in the shape of a diamond. By adding more HSTs and arranging them in different patterns, more complex star quilt blocks can be created.
Checkerboard Patterns
Using HSTs, it is possible to create checkerboard patterns of various sizes. For a basic checkerboard, two HSTs can be arranged in a square, with two HSTs arranged in the opposite direction in the next square. By adding more HSTs, larger and more intricate checkerboard patterns can be created.
Floral Designs
HSTs can also be used to create floral designs. By arranging the HSTs in a circular pattern, it is possible to create a flower-like design. By adding more HSTs and arranging them into different patterns, it is possible to create even more intricate floral designs.
What Triangle is Half a Square Quilt?
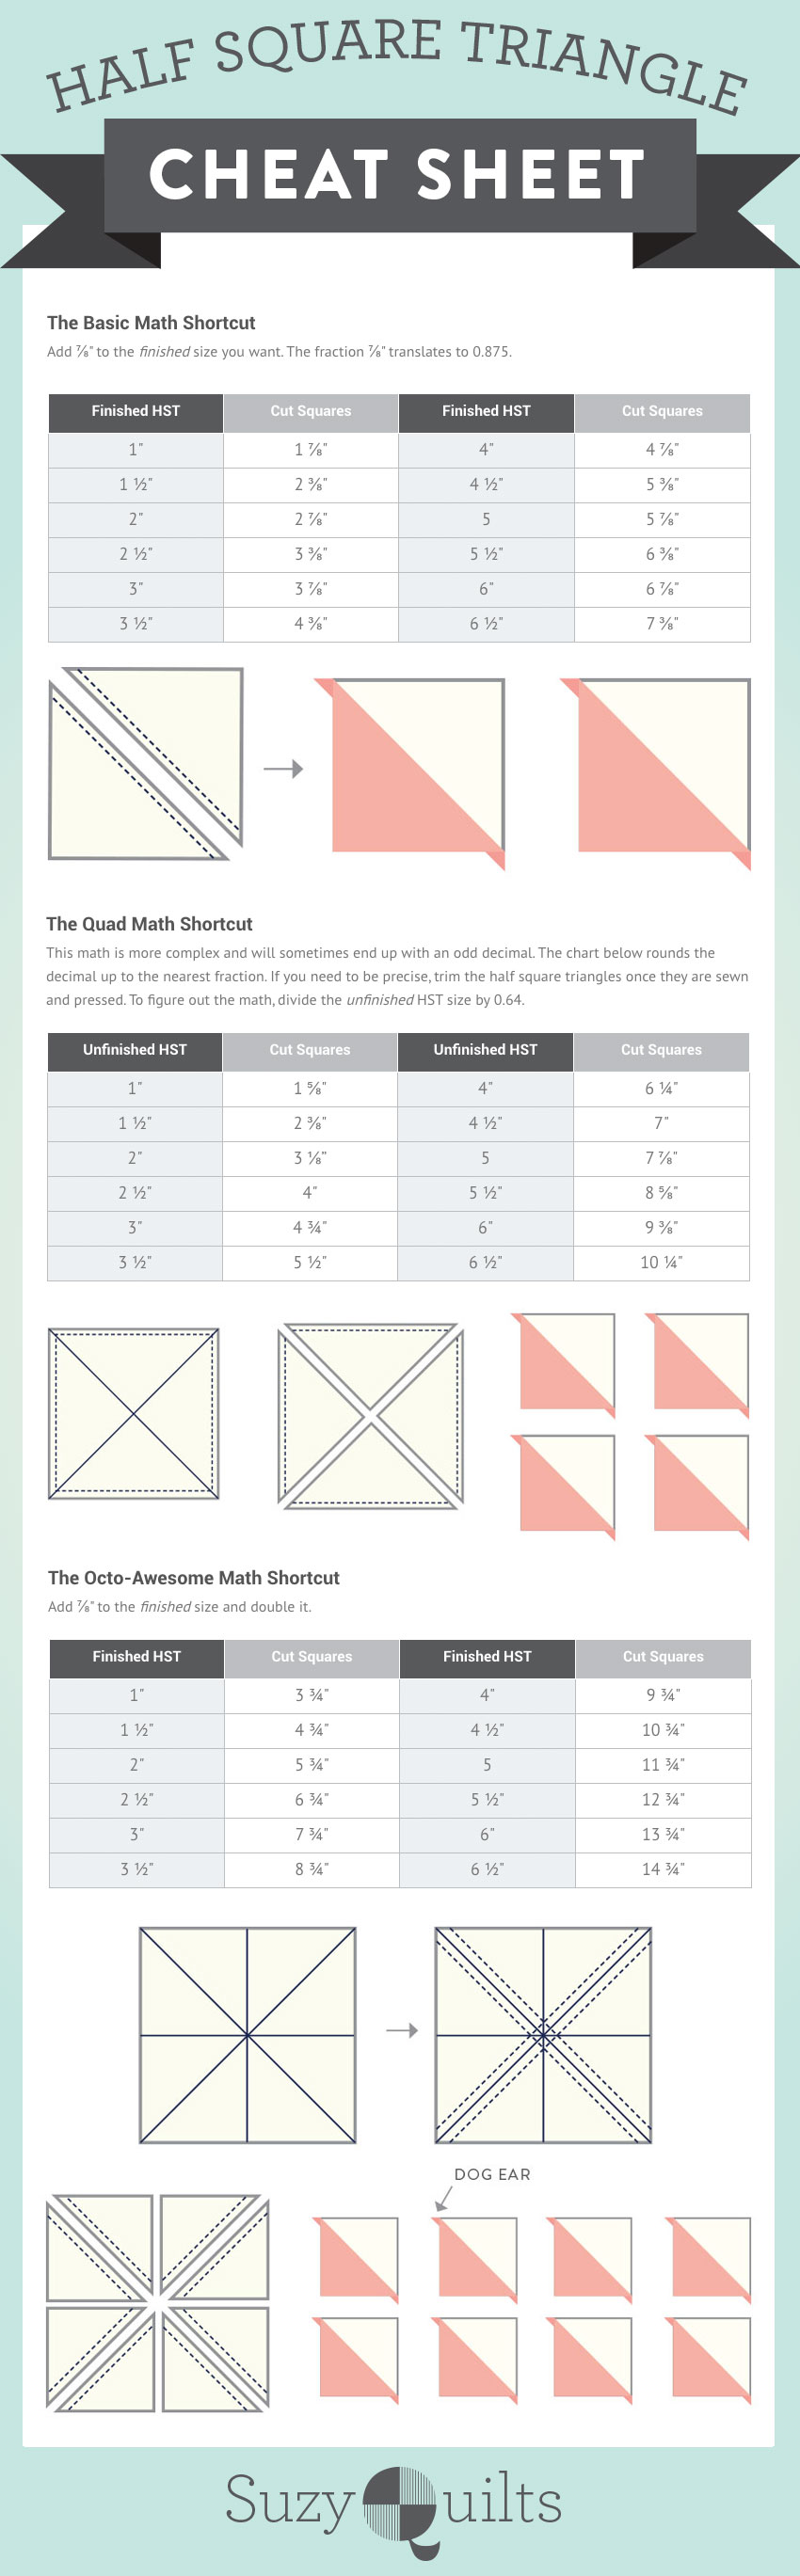
A half square triangle quilt is a quilt made up of half square triangles. Half square triangles are created by taking two squares of fabric, sewing them together along the diagonal, then cutting them apart to form two triangles. These triangles can then be arranged in various patterns to create a quilt.
No matter what type of quilt block you want to make, HSTs are a great way to get started. With the right arrangement of HSTs, it’s possible to create quilt blocks of all shapes and sizes.
Preparing the Fabric

- Start by selecting two different fabrics, one light and one dark.
- Cut two rectangles from each fabric, each measuring 14″ x 8″.
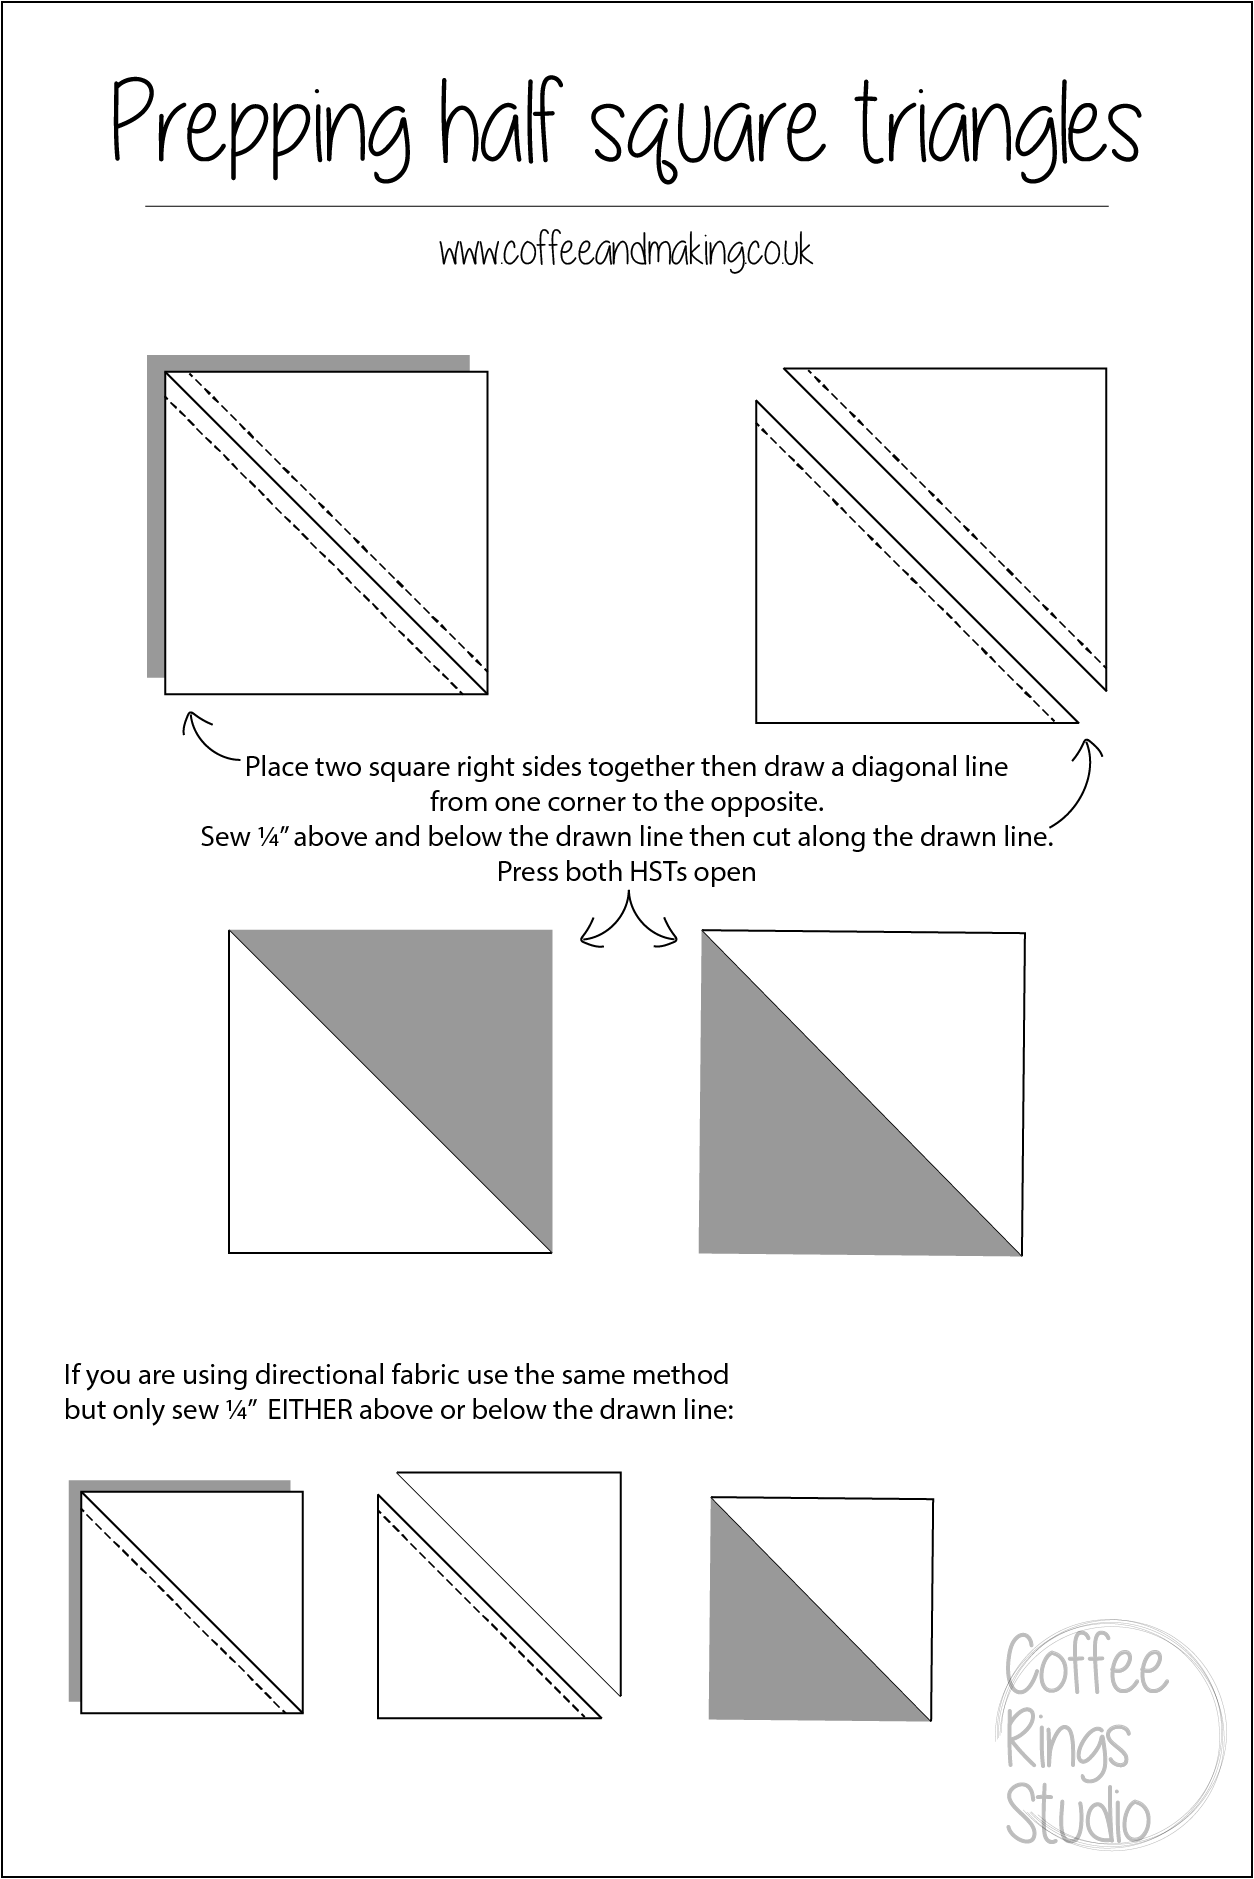
- Place the rectangles right sides together, matching the edges, and pin in place.
- Draw a diagonal line across the rectangles and cut along the line.
- Remove the pins and press each of the four squares.
- Repeat with the remaining fabrics until you have the desired amount of half square triangles for your lap quilt.
Cutting Out the Half Square Triangles
- Accuracy is Key: When cutting out half square triangles, it is important to use a rotary cutter and ruler. A rotary cutter is a circular blade which is used to cut fabric. A ruler is used to measure and create straight lines. Using this combination of tools ensures that each triangle is the same size.
- Using Precut Strips: If time is limited, precut strips of fabric can be used to make the job easier. These precut strips are available in a variety of sizes and can be purchased from fabric stores. By using precut strips, the time it takes to cut out the half square triangles is greatly reduced.
- Layering the Fabric: To ensure accuracy when cutting out the triangles, it is important to layer the fabric. Lay the fabric on a flat surface, on top of a piece of cardboard or a cutting mat. Place the ruler on top of the fabric, making sure that the edge of the ruler is aligned with the edge of the fabric. This will ensure that the ruler stays in place while the fabric is being cut.
- Cutting the Fabric: Once the fabric is layered and the ruler is in place, the fabric can be cut. Using the rotary cutter, cut along the edge of the ruler. Make sure to use a steady and consistent motion. This will ensure that the fabric is cut in a straight line. After the fabric is cut, the half square triangles are ready to be sewn together.
Sewing the Half Square Triangles Together
- Half Square Triangles (HSTs) are created by sewing two squares of fabric together and then cutting the resulting block in half diagonally.
- HSTs are one of the most versatile quilt blocks and are a great way to add interest and texture to a quilt.
- When sewing HSTs together, it is important to use a quarter-inch seam allowance.
- It is also important to press the seams in alternating directions to help reduce bulk in the quilt.
- When sewing two HSTs together, it is best to line them up so that the two seams are perfectly aligned.
- This will ensure that the point of the triangle is perfectly sharp and that the HSTs lay flat when the quilt is finished.
- When sewing HSTs together, it is best to use a longer stitch length than normal, as this will help the seams to lay flat and reduce the bulk of the quilt.
- Finally, when sewing a large number of HSTs together, it is best to chain piece the blocks together, as this will save time and reduce the need for pinning.
Pressing the Half Square Triangles
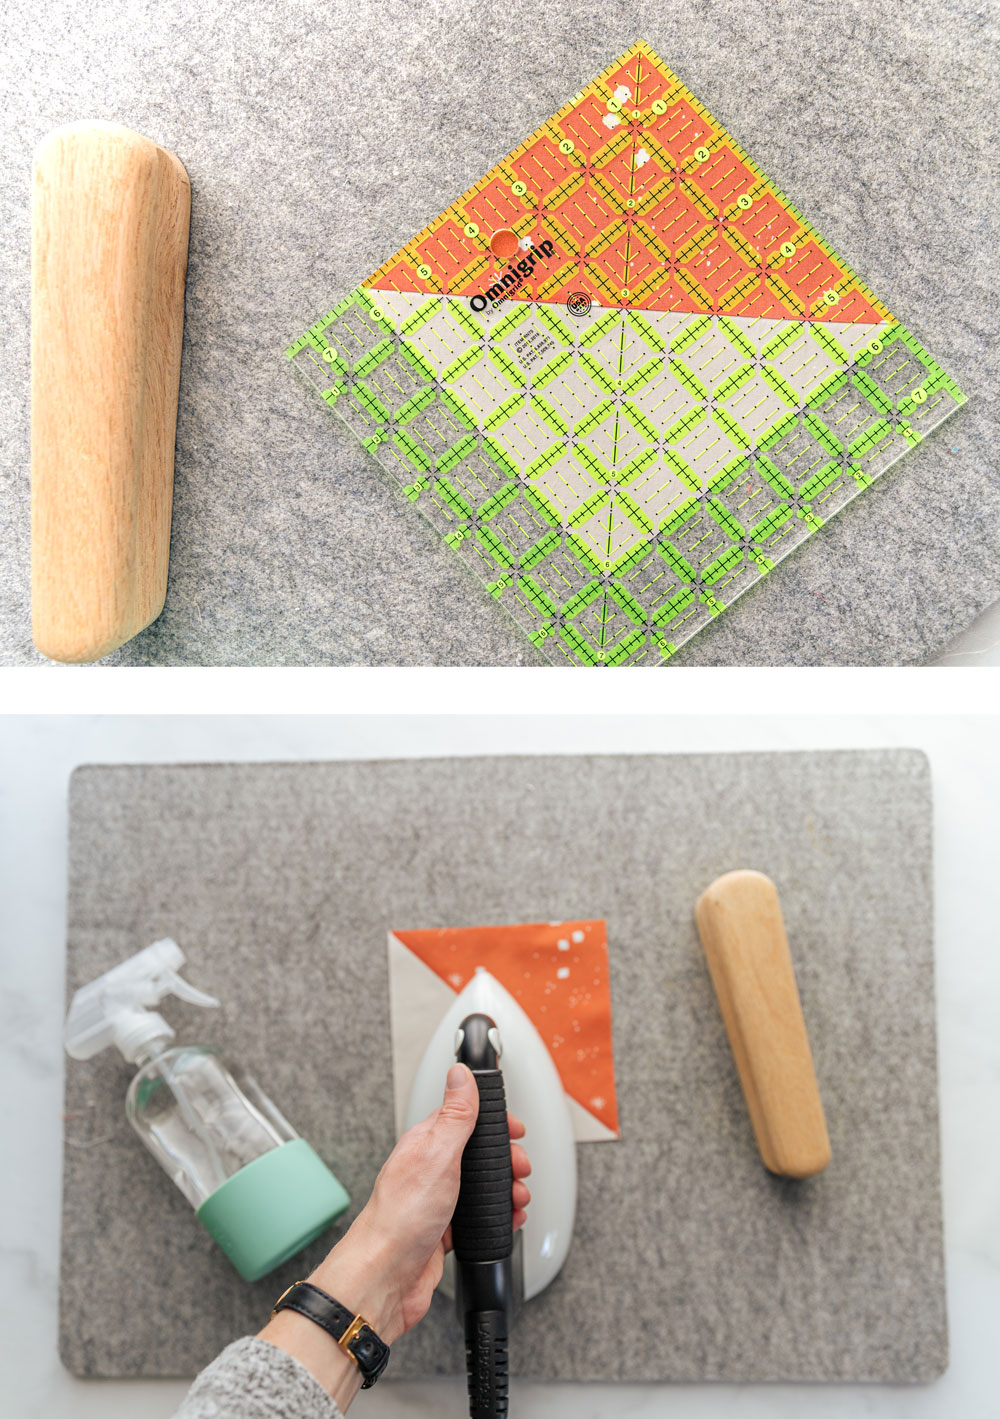
- Line up the two triangles, right sides together and the selected fabric on the outside.
- Sew along the drawn line, using a ¼ inch seam allowance.
- Cut along the drawn line, making sure to clip the corners.
- Press the seam allowance open.
- Trim the two triangles to the desired size.
Creating the Quilt Blocks
- Choose your fabric: Selecting the right fabric for your quilt is essential. Look for colors that complement each other, as well as fabrics that are durable and washable. It’s also important to consider the size of the fabric – you will need enough to make all the individual blocks of the quilt.
- Cut the fabric: Starting with your chosen fabric, you will need to cut it into a variety of shapes and sizes. The most common block for a quilt is the half square triangle, which involves cutting the fabric into two pieces of equal size.
- Piecing together the squares: Next, you will need to sew the two pieces of fabric together. To ensure the best results, you should use a ¼” seam allowance. Sewing the pieces together in the right way will create a triangle shape.
- Iron and trim the blocks: Once the blocks are sewn together, you will need to iron them and trim the edges. This will help to make sure that all the blocks are the same size and shape.
- Assemble the quilt top: After the blocks are finished, it’s time to assemble the quilt top. You will need to lay out the blocks in the pattern of your choice, and then sew them together.
- Add batting and backing: Once the top of the quilt is complete, you will need to add the batting and backing. This will help to make the quilt more comfortable and durable.
- Quilt and bind the edges: Finally, you will need to quilt and bind the edges of the quilt. This will help to make the quilt more secure, and also add a decorative touch.
Assembling the Quilt Top
- Lay out your quilt blocks. Arrange the blocks in a pleasing pattern, taking into account the color and pattern of each block. Make sure that the edges of each block are aligned with those of its neighbors.
- Sew the blocks together. Sew the blocks together in rows. Place the two blocks right sides together and stitch them along the edge using a ¼” seam allowance. Once the blocks are all sewn together, press the seams open.
- Sew the rows together. Place the two rows right sides together and stitch them along the edge using a ¼” seam allowance. When you sew the rows together, make sure to line up the seams so that they will match up. Once the rows are all sewn together, press the seams open.
- Add borders. If desired, you can add borders to your quilt top. Measure the quilt top and cut the borders to size. Sew the borders to the quilt top, making sure to match up the seams.
- Quilt and bind. Once the quilt top is assembled, it’s time to quilt and bind the quilt. Refer to the quilting and binding tutorials for more information.
Using half square triangles, you can make a variety of quilt blocks, including pinwheels, flying geese, and more. A half square triangle is a triangular shape that is half the size of a square. For a lap quilt, you will need about 48 half square triangles. Assembling the quilt top is the next step in making a half square triangle quilt.
Finishing the Quilt
Once you have completed sewing all of your Half Square Triangle blocks together, you will have a quilt top that is ready to be layered and quilted. To layer your quilt, you will need to cut a piece of batting and backing fabric that is slightly larger than your quilt top. Place the batting on the floor or a flat surface, then place your quilt top on top of that. Then place the backing fabric on top of the quilt top. Pin the layers together with safety pins or basting spray to hold them in place.
Once your quilt layers are secured, you can begin quilting. There are many quilting techniques that you can use, such as straight line quilting, free motion quilting, or echo quilting. Quilting helps to secure the layers of the quilt and give it a finished look. When you are finished quilting, trim the excess batting and backing fabric from the edges.
To finish the quilt, you will need to bind the edges. You will need to cut strips of fabric, usually 2 ½” wide, to use for binding. Sew the binding strips together to create a continuous strip of fabric. Then, attach the binding to the quilt. You can either hand sew the binding or machine stitch it in place. When you have finished binding the quilt, you have completed your Half Square Triangle quilt!
Frequently Asked Questions
What type of quilt fabric is best to use for this project?
For this project, 100% cotton quilting fabric is ideal for its durability and breathability. Look for fabrics that have a tight weave and a smooth texture. Avoid fabrics with a lot of texture or stretch to them as these will not work as well for this project. Additionally, choose fabrics with a light to medium weight, as heavier fabrics will be difficult to sew together.
What types of quilt patterns can be created with Half Square Triangles?
- Star Quilts: Star quilts are a classic quilt pattern that can be created using half square triangles. They can be arranged in a variety of ways, creating interesting geometric shapes and patterns.
- Log Cabin Quilts: Log cabin quilts, also known as Railroad Quilts, can be made with half square triangles to create a checkerboard effect.
- Dresden Plate Quilts: Dresden plate quilts are a type of applique quilt that can be made with half square triangles. The triangles are arranged in a circular pattern to create a plate-like design.
- Patchwork Quilts: Patchwork quilts are a type of quilt that is made up of small pieces of fabric sewn together to create a unique pattern. Half square triangles are often used to create patchwork quilts.
- Rail Fence Quilts: Rail fence quilts are a type of quilt made up of strips of fabric arranged in a repeating pattern. Half square triangles can be used to create a rail fence quilt pattern.
What is the Best Way to Ensure Accurate Stitching When Making Half Square Triangles?
The key to accurate stitching when making half square triangles is to use a generous ¼” seam allowance. This will allow for slight variations in the fabric cuts, as well as the stitching accuracy. To ensure the best results, use a ¼” foot or quilting guide to make sure your seam allowance is consistent. Additionally, press the seams after each step to make sure the seams lie flat and the points match up. Finally, use pins to secure the fabric pieces in place before stitching.
How much quilt batting should I use when making a quilt with Half Square Triangles?
Choose a Batting:
- Depending on the desired look and feel of your quilt, choose a batting that is appropriate for the project.
- The weight and loft of the batting will affect the warmth, drape, and durability of the quilt.
Measure Batting:
- Once the batting is chosen, measure the batting to match the quilt top, adding 1-2 inches for shrinkage.
- If the quilt is to be quilted by hand, the batting should be cut slightly larger than the quilt top.
- If the quilt is to be quilted on a machine, the batting should be cut slightly smaller than the quilt top.
Cut Batting:
- Cut the batting to the size desired.
- When cutting the batting, use a sharp rotary cutter and a straightedge.
- If the batting is not cut to the proper size, it will not fit correctly in the quilt.
What is the best way to press the Half Square Triangles to ensure the quilt is flat?
- Press Open – Press each half square triangle open, pressing one triangle to the right and the other to the left. This will help the triangle to lie flat and reduce bulk.
- Press the Seam – After pressing the triangle open, press the seam. This will help the seam to lay flat and reduce bulk.
- Press Down – Once the seam is pressed, press down on the seam. This will help the triangle to lay flat and reduce bulk.
- Press with Steam – To further reduce bulk and get the triangle to lay flat, press with steam. This will help the triangle to lay flat and reduce bulk.
Pressing the half square triangles correctly will ensure the quilt is flat and will reduce bulk.
Conclusion
Half square triangle quilts are a classic quilt pattern that can be used to make a range of quilts from traditional to modern. With the step-by-step guide provided, you can easily create perfectly stitched triangles for your quilt. With the right supplies and a bit of practice, you can make a beautiful quilt that will last for years.


